Adorable Crochet Sushi Cats : Free Pattern
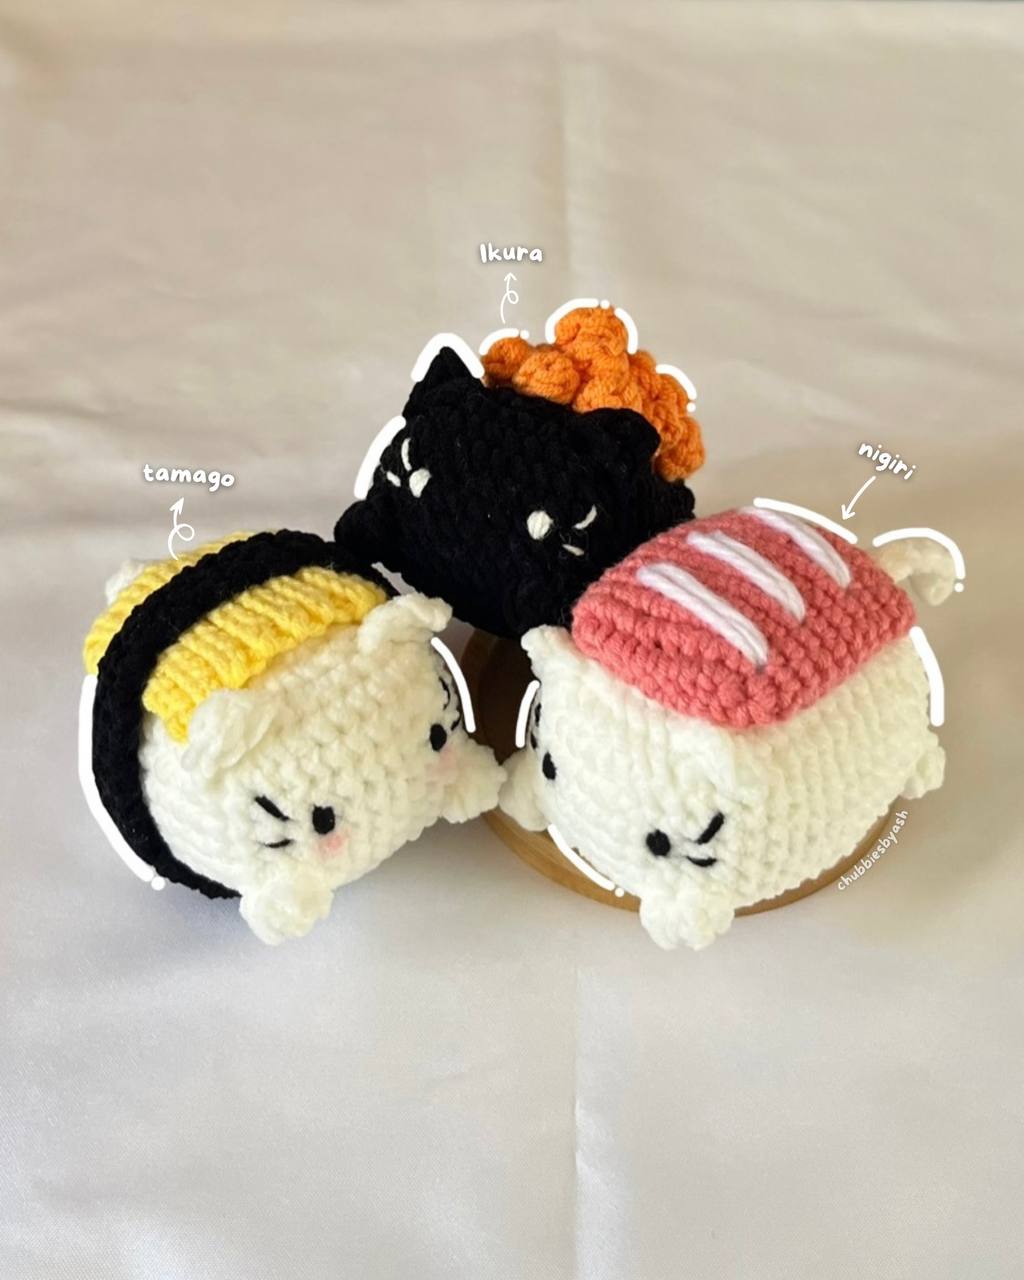
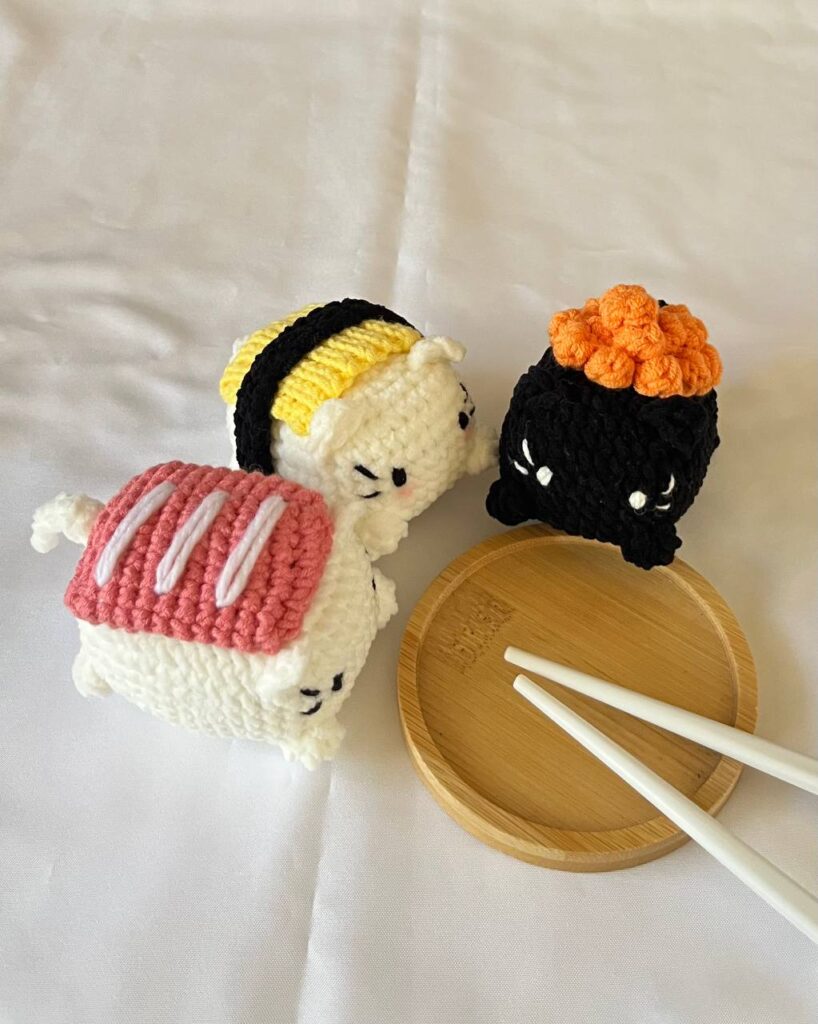
Welcome to the first crochet project of the year! 🎉 This week, I’m sharing a super fun and adorable tutorial to make your very own SushiCat. 🐱🍣
This quirky little amigurumi is the perfect mix of cute and creative! Whether you’re a sushi fan or just love making playful crochet projects, you will definitely love this pattern.
Grab your hooks, pick out some yarn, and let’s get hooked.
✨ Don’t forget to check out more free patterns on my website and follow me on Instagram for more crochet inspiration!
Copyright Notice @chubbiesbyash__ The crochet patterns shared on this blog are designed by me and are for personal use only. You are welcome to sell any finished items made from these patterns, but mass production and selling the patterns themselves are not allowed. Please don’t use the photos from this blog without permission. If you share your creations, I’d appreciate it if you credit me with a link to my blog, Instagram or YouTube channel as this helps me grow as a creator. Thanks for your support!
Materials Needed
- Cotton(5ply) , Acrylic, Sport or Thin Chenille yarn in White, Black, Orange, Dark Pink, Yellow
- 3mm crochet hook
- Stuffing material
- UHU Glue
- stitch markers, darning needle, pins and scissors
Crochet Abbreviations
- Ch – Chain
- st – stitch
- mr – magic ring
- sc – single crochet
- inc – increase
- dec – decrease
- Bob – bobble stitch
- dc – double crochet
- BLO – back loop only
- FLO – front loop only
- slst – slip stitch
- *- repeat
- [] – total stitch count in each round/row
Do not miss out any details! Open this video as you crochet along to make the process more effective and timesaving.
Body
Note: For this part, we’ll use joined rounds, meaning to connect with a slst into the 1st sc after every round. Start every new round with a Ch1, and start again from the sc that you just made a slst into. Ch1 and slst are NOT included in our total stitch count.
Start with a slip knot using black or white yarn.
Make 10ch.
R1 Starting from 2nd ch from the hook, 1inc, 7sc, (4sc in one ch), 7sc, 1inc, 1slst (into the 1st sc of R1) [22]
R2 Ch1, 1sc, (3sc in on st), 7sc, (3sc in on st), 2sc, (3sc in on st), 7sc, (3sc in on st), 1sc, 1slst [30]
R3 Ch1, 2sc, (3sc in on st), 9sc, (3sc in on st), 4sc, (3sc in on st), 9sc, (3sc in on st), 2sc, 1slst [38]
R4 Ch1, 3sc, (3sc in on st), 11sc, (3sc in on st), 6sc, (3sc in on st), 11sc, (3sc in on st), 3sc, 1slst [46]
R5-R9 Ch1, 46sc, 1slst (5 rounds) [46]
- BOB st in R10 are made of 4dc only.
- Watch this part of the tutorial to see how to make a 4dc bobble st.
R10 Ch1, 4sc, 1BOB, 13sc, 1BOB, 8sc, 1BOB, 13sc, 1BOB, 4sc, 1slst [46]
R11 Ch1, 3sc, (3sc dec), 11sc, (3sc dec), 6sc, (3sc dec), 11sc, (3sc dec), 3sc, 1slst [38]
R12 Ch1, 2sc, (3sc dec), 9sc, (3sc dec), 4sc, (3sc dec), 9sc, (3sc dec), 2sc, 1slst [30]
- Start stuffing the body after R12 and continue stuffing after each following round.
R13 Ch1, (3sc,1dec) *6, 1slst [24]
R14 Ch1, (2sc, 1dec) *6, 1slst [18]
R15 Ch1, (1sc, 1dec) *6, 1slst [12]
R16 Ch1, 6dec [6]
- Cut the yarn leaving a long tail.
- Close the remaining hole using a darning needle. Watch this part of the tutorial for a more detailed explanation on this part.
Embroider the Face
- Using three strands of black yarn, embroider the eyes on R7 in the middle with 6sc apart between two eyes.
- Embroider two whiskers beside each, eye using the two strands of yarn.
- Watch this part of the tutorial to see how to embroider the face.
Ears
- Crochet the ears directly across R3 to R5.
- Watch this part of the tutorial for a more detailed explanation.
Ch3, starting from 2nd ch from the hook, 1sc, 1dc, skip 1round (R4), 1slst on the body.
- Cut the yarn and weave in the ends.
Tail
Crochet the tail directly onto the body just like the ears on R5 right in the middle.
Ch6, starting from 2nd ch from the hook, 1slst, 4sc
- Cut the yarn and weave in the ends.
Salmon Eggs
Start with a slip knot using Orange yarn.
Make 50ch
Starting from 3rd ch from the hook, (3dc cluster st, skip 1ch, 1sc) *16
- Watch this part of the tutorial for a more detailed explanation.
Fish
Start with a slip knot using dark pink yarn.
Make 7ch.
R1 Starting from 2nd ch from the hook,1inc, 4sc, (4sc in one ch), 4sc, 1inc, 1slst [16]
R2 Ch1, (3sc, 1inc) *4, 1slst [20]
R3-R11 Ch1, 20sc, 1slst (9 rounds) [20]
R12 Ch1, (3sc, 1dec) *4, 1slst [16]
- Cut the yarn leaving a long tail.
- Close the meat and embroider white stripes using the white yarn.
Omelet
Start with a slip knot using the Yellow yarn.
Make 13ch
R1 Starting from 2nd ch from the hook,12slst
R2 BLO, 12slst
- Repeat R2 until you get the desired width. I repeated mine until it was 4cm wide.
- Cut the yarn leaving a long tail.
Seaweed Strip
Start with a slip knot using black yarn.
Make 3ch
R1 Starting from 2nd ch from the hook, 2sc [2]
R2 Ch1 & turn, 2sc [2]
- Repeat R2 until you get the desired length which fits perfectly for your sushi cat.
Assembly
- You can use glue or sew the food together with the cats. I used a mix of glue and remaining yarn tails to sew.
- You can the tutorial starting from here where I show how to assemble and shape each sushi cat.
- This part can be quite challenging especially for beginners but if you are patient and you take it one step at a time, you will get a super adorable amigurumi which you diligently made with your own hands.
And there you have it! You’ve done an amazing job getting this far. Take a moment to admire your work—you’ve put in the effort, and it shows. It might not be perfect, but it’s a reflection of your creativity and dedication, and that’s what truly matters. Be proud of what you’ve accomplished!
[ From Ash ] 𐙚
Hi there🌸
Thank you for checking out my crochet pattern! I hope you find joy and inspiration in the patterns I share.
If you create any amigurumi using my patterns, I would be thrilled and honored if you could give me credit in your posts. Sharing your creations and crediting the pattern helps our crochet community grow and allows others to find and enjoy these patterns too. 🧶✨
I’m grateful for your support and can’t wait to see your beautiful work. Feel free to leave a comment if you have any questions or just want to share your project.
Happy crocheting! ❤️


3 comments